“Did you know that the secret to those beautifully finished edges on your favorite store-bought clothes lies in a serger? If you’ve been eyeing the Singer S0230 Serger Overlock Machine but felt overwhelmed by its complexity, you’re in the right place. Let’s demystify this incredible tool and make it an indispensable part of your sewing arsenal!”
In this comprehensive guide, we’re about to unlock the full potential of the Singer S0230 Serger Overlock Machine. Designed for beginners and a handy refresher for experienced sewists, this post will transform your approach to serging. You’ll learn not only how to thread your machine with ease but also how to use it to elevate your sewing projects. Say goodbye to frayed edges and hello to professional-looking garments!
Understanding Your Singer S0230
Anatomy of the Singer S0230, The Singer S0230 is a complex but user-friendly machine, and understanding its parts is key to mastering its use. Key components include:
- Spool Pins: These hold the thread spools and can be located at the top of the machine.
- Thread Guides: These guide the thread from the spool to the needles.
- Tension Discs: Located on the front of the machine, they control the tension of the thread.
- Needles: The S0230 typically uses two needles for various stitch types.
- Looper: The part that interlocks the thread underneath the fabric.
- Feed Dogs: These teeth-like components move the fabric through the machine as you sew.
- Stitch Length and Width Dials: Adjust the size of the stitches.
- Differential Feed Control: Adjusts the feed dogs for stretch or thin fabrics.
- Presser Foot: Holds the fabric down against the feed dogs.
Understanding each of these parts and their functions is crucial for efficient use of your serger.
Preparing Your Workspace, Setting up your serging space effectively can greatly impact your sewing experience. Consider the following:
- Adequate Lighting: Ensure your workspace is well-lit to reduce eye strain and improve accuracy.
- Ergonomic Seating: A comfortable chair that supports your back can make longer sewing sessions more pleasant.
- Flat Surface: A stable and flat surface is essential for the serger to operate smoothly.
- Thread Storage: Organize your threads nearby for easy access.
- Waste Bin: Keep a small bin close by to dispose of trimmed fabric and threads.
- Essential Tools: Have scissors, tweezers, and a needle threader within reach.
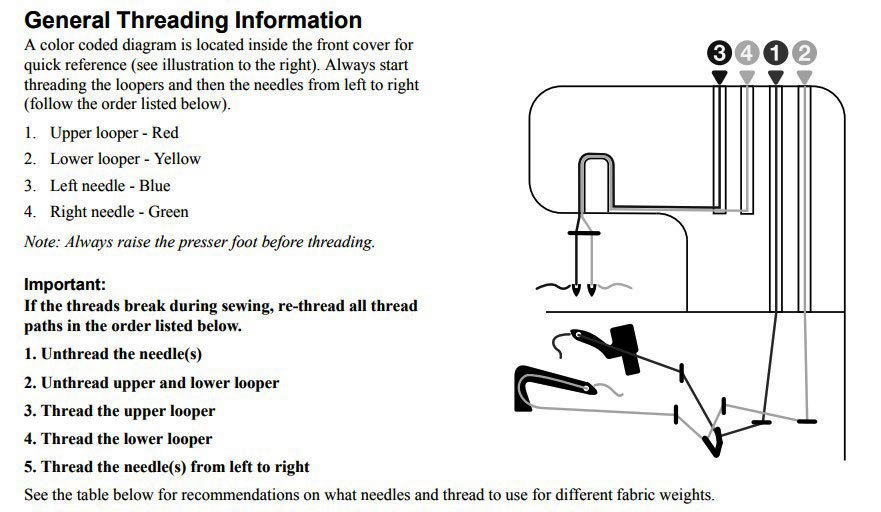
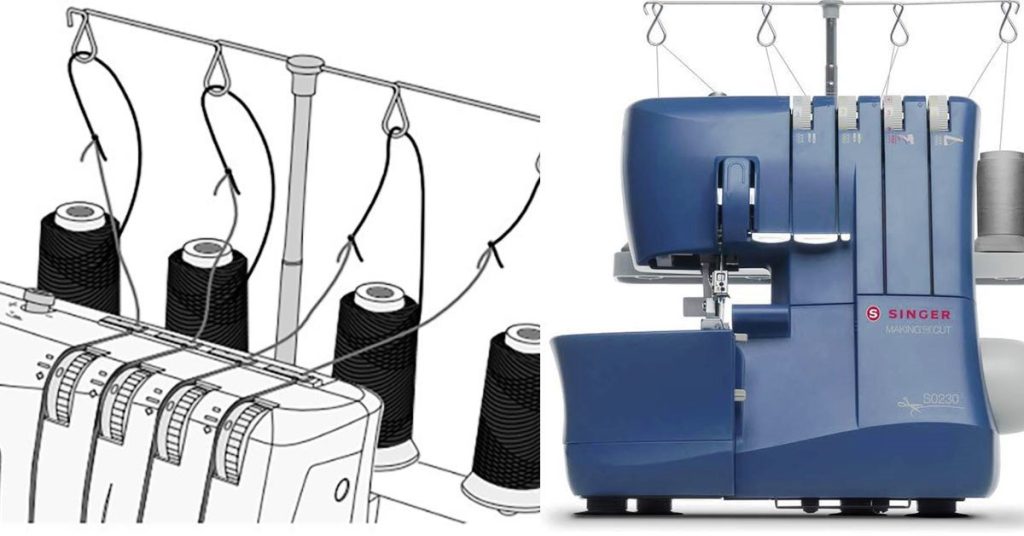
The Threading Singer S0230 Adventure: Step-by-step guide
Threading a serger like the Singer S0230 is a precise task that requires attention to detail. Here’s a step-by-step guide to help you thread it correctly:
Step-1. Raise the Presser Foot:
This action opens the tension discs, making them easier to thread. The presser foot lifter is usually located at the back of the machine.
Step-2. Thread the Upper Looper:
- Locate the upper looper thread path, which is typically color-coded for ease.
- Start by placing the thread on the spool pin and pass it through the first thread guide.
- Follow the color-coded path, which usually involves passing the thread through a series of guides and loops. This path often goes over the top of the machine and then down to the upper looper.
- Ensure that the thread is firmly seated in the tension discs.

Step-3. Thread the Lower Looper:
- The lower looper can be more challenging due to its position and accessibility.
- Repeat the process of following the color-coded path specific to the lower looper.
- You may need to use tweezers for precision, especially for guiding the thread through tighter spaces.
- The lower looper usually requires the thread to go underneath the machine’s mechanism, which is why it’s a bit trickier.

Step-4. Thread the Right Needle:
- Place the thread in the right needle position on the spool pin.
- Guide the thread through the respective path, which involves passing it through various guides.
- Use the thread guides to bring the thread down to the needle area.
- Thread the right needle, ensuring that the thread slips properly into the tension discs.
Step-5. Thread the Left Needle:
- The process for threading the left needle is similar to the right.
- Ensure the thread is placed on the correct spool pin for the left needle.
- Follow the threading path, which will be slightly different from the right needle but similar in approach.
- Thread the left needle, making sure it’s also properly seated in the tension discs.
Example: Let’s say you’re setting up your Singer S0230 to work on a standard 4-thread overlock stitch. You would start by selecting four threads of your choice – let’s go with red, blue, green, and yellow. You would then:
- Place the red thread on the spool pin for the upper looper and follow the red-marked path to thread it.
- Next, take the blue thread for the lower looper, place it on the designated spool pin, and thread it along the blue-marked path, using tweezers for the more challenging parts.
- The green thread would be for the right needle; you’d place it on the corresponding spool pin and follow the green-marked guides to thread the right needle.
- Finally, the yellow thread would go on the left needle spool pin, following the yellow path to thread the left needle.
After threading, it’s always a good practice to do a test run on a scrap piece of fabric to ensure that the tension and stitches are correctly set up. Remember, the key is to follow the color-coded guides and take your time with each step for a successful threading experience.
Common Threading Pitfalls:
- Missed Thread Guides: Missing a guide can cause the thread to tangle or break.
- Incorrect Tension: Improperly threaded tension discs can result in uneven stitches.
- Looper Confusion: Mixing up the upper and lower looper threads is common but affects stitch quality.
- Unthreading Needles: The needles should be the last parts to thread to prevent them from unthreading when you thread the loopers.
Getting Started with Your First Stitches
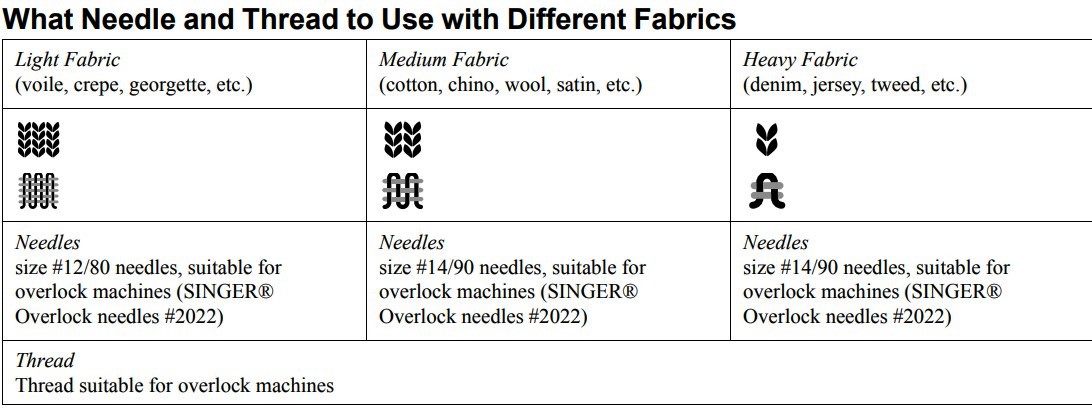
Choosing the Right Thread and Material:
- Thread Type: Polyester thread is a good all-purpose choice for its strength and flexibility.
- Fabric Consideration: Use finer threads for lightweight fabrics and thicker threads for heavier materials.
- Color Matching: Ideally, use four spools of the same color that match your fabric.
Basic Stitches:
- 4-Thread Overlock: The most common and strongest serger stitch, great for seams.
- 3-Thread Overlock: Used for finishing edges or decorative edging.
- Rolled Hem: A narrow hem suitable for lightweight fabrics. Requires removing one needle.
- Flatlock Stitch: Lays flat against the fabric, ideal for seams that shouldn’t be bulky.
Starting with these basic stitches and experimenting with scrap fabric is a great way to get comfortable with your Singer S0230. As you gain confidence, you can explore more complex stitches and techniques. Remember, patience and practice are key to mastering serging.
Navigating the Controls
Tension, Length, and Width Settings:
- Tension: Adjusting the tension is crucial for preventing loose or puckered stitches. Each thread has its tension dial. For most fabrics, a mid-range setting works, but you may need to adjust based on the fabric’s thickness and stretchiness.
- Stitch Length: The stitch length controls how close the stitches are. A shorter stitch length is ideal for finer fabrics, while a longer stitch can be used for heavier fabrics.
- Stitch Width: This setting determines how wide the stitches are. A wider stitch is great for overlocking edges, while a narrower stitch is used for rolled hems and delicate fabrics.
The Role of Differential Feed:
- The differential feed controls how the feed dogs move the fabric. It’s essential for preventing stretching or gathering in stretchy or lightweight fabrics.
- For stretchy fabrics, increase the differential feed to prevent the fabric from stretching out.
- For thin fabrics, reduce the differential feed to avoid puckering.
Exploring Advanced Features
Creating Rolled Hems and Decorative Edges:
- Rolled Hems: To create a rolled hem, remove one of the needles and adjust the tension and stitch width. This stitch is perfect for lightweight fabrics like chiffon.
- Decorative Edges: Play with different threads (like woolly nylon) and adjust tension settings to create unique decorative edges.
Tips for Serging Different Types of Fabrics:
- Delicate Fabrics (e.g., silk, chiffon): Use a finer thread, lower tension, and a narrow stitch width.
- Stretchy Fabrics (e.g., knits): Increase differential feed, use a stretch stitch, and a balanced tension.
- Heavy Fabrics (e.g., denim): Use a longer stitch length, and stronger thread, and ensure proper tension for thick layers.
Maintenance and Troubleshooting
Regular Care for Longevity:
- Cleaning: Regularly clean lint and debris from the machine, especially from the loopers and feed dogs.
- Oiling: Lightly oil the machine as recommended in the manual to keep it running smoothly. Read more about Singer S0230 serger manual PDF
- Needle Replacement: Change needles regularly to ensure clean stitches.
Troubleshooting Common Issues:
- Skipped Stitches: Often due to a dull or bent needle. Replace the needle.
- Thread Breaking: Check for proper threading and tension settings. Also, ensure the use of quality thread.
- Uneven Stitches: Adjust the differential feed or re-thread the machine.
Project Ideas for Practice
Simple Projects:
- Napkins or Placemats: Practice straight lines and corners.
- Simple Tote Bag: Work on seams and finishing edges.
Expanding Your Horizons:
- Garments: Try making a simple skirt or T-shirt to get comfortable with sewing garments.
- Home Decor: Create cushion covers or curtains for more challenging projects.
Conclusion:
In navigating the journey of threading and using the Singer S0230 Serger Overlock Machine, we have traveled from the fundamentals to more advanced techniques. This guide aimed to demystify the process, breaking down each step into manageable parts – from threading the upper and lower loopers to handling the right and left needles with confidence.
The Singer S0230, with its array of features, offers a world of possibilities for enhancing your sewing projects. Understanding the tension, length, and width settings, as well as mastering the differential feed, are keys to achieving smooth, professional-quality stitches on a variety of fabrics. Whether you’re working with delicate silks or sturdy denim, the Singer S0230 adapts to your creative demands.
Moreover, exploring advanced features like creating rolled hems and decorative edges opens up new avenues for creativity. Regular maintenance and troubleshooting ensure that your sewing journey is smooth and uninterrupted, paving the way for years of sewing enjoyment.
As you embark on this serging journey with your Singer S0230, remember that practice and patience are your best allies. Start with simple projects to build your confidence and gradually move to more complex creations as your skills grow. The Singer S0230 is more than just a sewing machine; it’s a gateway to expanding your creative horizons and bringing a touch of professionalism to your sewing projects. Every expert was once a beginner, and with this guide, your path to becoming a serging pro is well within reach.