Greetings and Introduction to Topic…
Have you ever found yourself nestled in a cozy crafting nook, swatches of vibrant fabrics cascading around, only to be thwarted by a stubborn thread refusing to glide through your Singer CG-590 sewing machine seamlessly?
Welcome, dear sewists, to a haven where we unravel such knotty issues together, guiding you meticulously on “How to Thread a Singer CG-590 Sewing Machine” and transforming potential frustrations into victories stitched with knowledge and confidence.

Importance of Proper Threading and Troubleshooting…
Why does threading demand such meticulous attention, and why is a guide for “Singer CG-590 C troubleshooting” pivotal for your sewing endeavors? The truth is, that proper threading is the lifeline of flawless stitches, ensuring each creation unfolds from your machine smoothly and accurately.
It is the silent, yet paramount player in safeguarding the harmony between your creative aspirations and their tangible manifestations. Furthermore, having a sound troubleshooting guide in your arsenal ensures that common sewing hurdles, like skipped stitches or thread bunching, become mere pauses instead of full stops on your creative journey.
Our exploration into threading and troubleshooting isn’t merely a guide; it’s a doorway into ensuring that every stitch, every fabric, and every creation unfurls seamlessly from thought to thread to textile.
Step-by-Step Guide: How to Thread a Singer CG-590 Sewing Machine
Step-1. Preparing the Bobbin and Bobbin Case
Winding the Bobbin:
- Start by placing your thread on the spool pin and secure it with a spool cap.
- Pull the thread through the thread guide and towards the bobbin winding tension disc.
- Ensure the thread is securely placed within the disc’s tension.
- Take the thread end and thread it through the hole in the bobbin from inside to outside.
- Secure the bobbin onto the bobbin winding spindle and push it to the right (towards the bobbin winding stop).
- While holding the free end of the thread, slowly press the foot controller to begin winding the bobbin. Once a few layers of thread are wound, pause to snip the protruding thread end close to the bobbin.
- Continue winding the bobbin until it is sufficiently filled, and subsequently, cut the thread to release it from the spool.

Inserting the Bobbin
- Ensure the machine is turned off to prevent any accidental injuries.
- Open the bobbin cover by pushing it towards the right.
- Hold the bobbin with the thread coming off the counter
- Clockwise and gently place it into the bobbin case.
- Guide the thread into the front slot of the bobbin case, leading it towards the left and under the tension spring, ensuring it exits through the side, leaving a small tail.
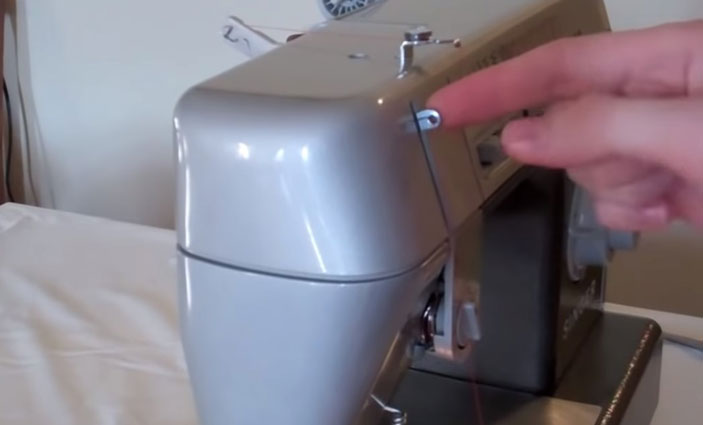
Step-2. Top Threading: Detailed Steps and Tips
Raising the Needle
- Ensure the needle is in its highest position by turning the handwheel towards you.
- It is pivotal that the needle is in the uppermost position to ensure the thread catches the loop correctly during the threading process.

Guiding the Thread
- Place the thread spool on the spool pin and secure it with a cap to avoid tangling.
- Guide the thread through the upper threading path, beginning with the thread guide and moving down toward the tension discs.
- Ensure the thread slips into the tension discs and follows through the take-up lever.
- Lead the thread down towards the needle, threading it from front to back, and ensuring a small tail of thread remains.
Step-3. Pulling Up the Bobbin Thread
- Holding the top thread tail in your left hand, gently turn the handwheel towards you with your right hand.
- Observe as the needle descends and rises, catching the bobbin thread.
- Pull the top thread upwards gently, bringing the bobbin thread up through the needle plate hole.
- Lay both the top and bobbin thread tails towards the back of the machine under the presser foot.
Step-4. Checking Thread Tension and Finalizing
- Ensure that both thread tails are lying flat and without knots or twists.
- Set your stitch selector to a straight stitch and adjust the stitch length to a mid-range setting.
- Perform a test stitch on a scrap piece of fabric to check the tension; both top and bottom stitches should appear even and lay flat.
- If needed, adjust the thread tension: if the top thread is visible on the bottom of the fabric, it is too tight, and if the bobbin thread is visible on top, it’s too loose.
- Finalize your settings, ensuring that the stitch length and type are suitable for your sewing project.
This step-by-step guide through the threading of the Singer CG-590, inclusive of preparation, threading, and final adjustments, aims to pave a smooth path from setup to sewing. Note that utilizing visuals, such as images or videos, in a blog post would significantly enhance understanding and user experience. Always ensure that your reader feels supported, encouraging them to refer back to steps as needed, and to not be disheartened by any mishaps – they are all part of the sewing journey!
Read More: How To Thread A Sewing Machine: Do You Really Need It? This Will Help You Decide!
Troubleshooting Common Issues: Singer CG-590 C Troubleshooting
| Issue | Potential Causes | Solutions and Tips |
|---|---|---|
| 1: Thread Breaking or Shredding |
|
|
| 2: Skipped Stitches |
|
|
| 3: Uneven Stitches or Bunching |
|
|
| 4: Machine Not Feeding Fabric Properly |
|
|
Additional Issues and General Troubleshooting Tips
- Always start with the basics: Ensure the machine is threaded correctly, the bobbin is inserted correctly, and the needle is in good condition and installed properly.
- Regular maintenance: Make sure to clean and oil your Singer CG-590 regularly to keep it in optimal working condition.
- Consult the manual: The Singer CG-590 manual will be your best friend in times of trouble, offering specific advice and diagrams for your model.
- Explore online forums and communities: Sometimes other sewers have encountered similar issues and may offer insights or solutions that are not present in the manual.
- Professional help: If you have recurrent issues or a problem you can’t solve, it’s advisable to consult a professional technician to avoid damaging your machine further.
These detailed troubleshooting tips for Singer CG-590 C should help users navigate through common issues they might encounter. Remember that patience and a systematic approach to troubleshooting are key to resolving most sewing machine issues. These aspects should be communicated in your blog post to encourage and support your readers throughout their sewing endeavors.
Maintenance Tips for Singer CG-590
A. Regular Cleaning and Oil Application
- Cleaning: Make it a habit to clean the machine after every project to remove lint and dust, focusing on the bobbin case and under the needle plate. Use a small brush (often provided with the machine) to access nooks and crannies.
- Oil Application: Use sewing machine oil and apply it to specified parts as per the manual. Make sure to run a few stitches on scrap fabric post-oiling to absorb excess and prevent staining on future projects.
B. Keeping a Good Condition of Threads and Needles
- Thread Care: Store threads away from direct sunlight and in a controlled environment to avoid degradation. Ensure to use thread that is not too old or weak to prevent unexpected breaks and snags.
- Needle Quality: Change the needle after every project or every 8-10 hours of sewing. Make sure to choose the right needle type and size for different fabrics and threads to ensure stitch quality and prevent damage.
C. Storing the Sewing Machine Properly
- Cover or Case: Utilize a dust cover or hard case to protect the machine from dust and environmental factors when not in use.
- Environment: Store it in a cool, dry place and avoid areas where it might be subject to knocks, extreme temperatures, or humidity which can harm the machine’s internal mechanics.
Conclusion
A. Summary of Key Points
Navigating through the intricacies of a sewing machine, especially a model as renowned as the Singer CG-590, requires a blend of technical know-how and gentle handling. Recapitulating, and threading the Singer CG-590 involves precise steps such as:
- Bobbin preparation: Accurate winding and insertion to ensure steady bottom threading.
- Top threading: Attentively passing the thread through various checkpoints to achieve a secure top thread.
- Balancing thread tension: Aligning top and bobbin thread tensions for consistent and strong stitches.
Reflecting on common issues discussed, such as thread breakage, skipped stitches, and fabric feeding problems, it is paramount to internalize the shared “Singer CG-590 C troubleshooting” tips. From using quality threads and appropriate needles to ensuring a stable working surface and proper machine threading, these pointers act as a first-aid kit for your sewing journey.
Example: “Mastering ‘How to Thread a Singer CG-590 Sewing Machine’ unveils the gateway to unbridled creative explorations in the fabric world. While the threading, tension settings, and troubleshooting tips outlined form the backbone of a smooth sewing experience, ongoing machine maintenance cannot be underestimated in safeguarding its longevity and consistent performance.”
B. Encouragement for New Sewers
Embarking on a sewing adventure with your Singer CG-590 can initially be a weave of excitement and trepidation. The machine, with its myriad of settings, knobs, and components, might seem daunting at first glance. However, remember that every proficient sewer was once a beginner, navigating through a similar maze of questions and mishaps.
The initial stages of your sewing journey might be punctuated with instances of tangled threads, uneven stitches, or perhaps a stubbornly uncooperative bobbin. It is essential here to embrace every misstep not as a failure but as a stepping stone toward sewing mastery. After all, understanding the root of a problem (be it in threading or tension) enlightens you on how to prevent or swiftly rectify it in the future.
Do not hesitate to revisit the threading guide whenever you find yourself entwined in a threading quandary. Additionally, leverage the “Singer CG-590 C troubleshooting” pointers as a constant ally in resolving unexpected hitches along the way.
Absorb knowledge from various platforms, engage in sewing forums, and don’t shy away from sharing your experiences, as your stories might well be the guidance a fellow beginner needs. Keep practicing, keep experimenting, and remember that each stitch, perfect or not, is a thread in the vast tapestry of your sewing journey.
In the world of sewing, patience is indeed a virtue. Every project, be it a quaint cushion cover or a bespoke dress, is a chapter in your sewing story, and every challenge is but a stitch that eventually binds your growing repository of skills and experiences.
Photo: Amazon