Threading a sewing machine is a fundamental skill that every sewing enthusiast should master, and the Brother CS6000i is a popular choice known for its versatility and ease of use.
In this comprehensive guide, we’ll walk you through the step-by-step process of threading the Brother CS6000i sewing machine, ensuring smooth and hassle-free sewing experiences every time.

Whether you’re a beginner or an experienced seamstress, understanding how to thread your machine correctly is essential for achieving impeccable stitching results.
Join us as we delve into the intricacies of threading this renowned sewing machine, providing detailed instructions and expert tips to help you navigate this crucial aspect of sewing with confidence.
Let’s dive into the intricacies of threading this beloved sewing machine.
Preparing Your Machine for Threading
Proper preparation is essential to ensure successful threading of your Brother CS6000i sewing machine. Follow these steps to prepare your machine before threading:
- Turn Off the Power:
Prioritize safety by switching off the power to your sewing machine before proceeding. Locate the power switch, usually located on the side or back of the machine, and toggle it to the “Off” position.

- Raise the Presser Foot:
Lift the presser foot using the lever situated behind or to the side of the presser foot. This action creates space between the presser foot and the needle plate, allowing for easier access and maneuvering of the thread during the threading process. Ensure the presser foot is fully raised to its highest position.
- Position the Needle:
Locate the handwheel, typically situated on the right-hand side of the sewing machine. Rotate the handwheel towards you (counterclockwise) until the needle reaches its highest position. You can do this by manually turning the handwheel. This step prevents the needle from accidentally hitting other machine parts while threading and ensures a clear path for threading the upper thread.
By following these detailed steps to prepare your Brother CS6000i sewing machine for threading, you’ll set the stage for seamless and hassle-free sewing experiences. Taking the time to properly prepare your machine ensures safety and facilitates smooth threading, allowing you to focus on your sewing projects with confidence.
How to Thread a Brother CS6000i Sewing Machine: Step-By-Step
Step 1: Winding the Bobbin
Winding the bobbin is the essential first step in preparing your Brother CS6000i sewing machine for flawless stitching. Follow these detailed instructions to ensure smooth bobbin winding every time:

- Locate the Bobbin Winding Mechanism:
Begin by identifying the designated area on your Brother CS6000i sewing machine for bobbin winding. This area is typically situated on the top or side of the machine, near the spool pin.
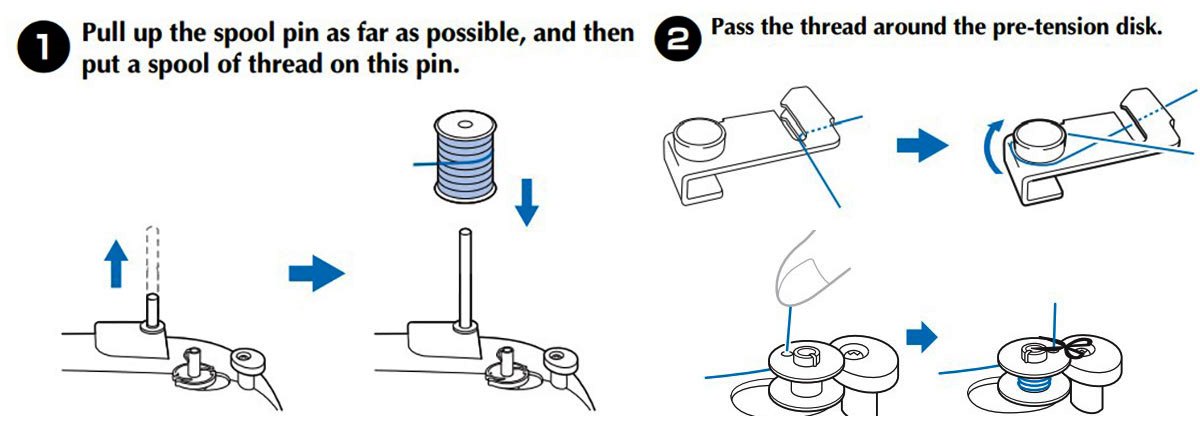
- Place the Spool of Thread:
Securely position the spool of thread on the allocated spool pin designed for bobbin winding. Ensure that the spool rotates smoothly without any hindrance to prevent tangling or uneven winding.
- Thread the Bobbin:
Take the end of the thread and guide it through the central hole of the bobbin. Leave a few inches of thread extending from the bobbin to ensure a secure start.
- Engage the Bobbin Winding Mechanism:
Depending on the specific design of your Brother CS6000i sewing machine, you may need to disengage the needle mechanism before engaging the bobbin winding mechanism. Consult the manual for precise instructions on this step.
- Start Winding:
Once the bobbin winding mechanism is engaged, press the foot pedal or activate the bobbin winding button to begin winding the thread onto the bobbin. Ensure to maintain gentle tension on the thread to promote even winding.
- Monitor Winding:
Throughout the winding process, keep a close eye on the thread as it winds onto the bobbin. Ensure that the thread distributes evenly across the bobbin’s surface to prevent any potential tension issues during sewing.
- Stop and Remove:
Once the bobbin is adequately filled with thread, stop the winding mechanism. Trim the excess thread tail extending from the bobbin, ensuring a neat finish. Then, carefully remove the bobbin from the winding mechanism, ready for insertion into the bobbin case.
By following these detailed steps, you’ll master the art of winding the bobbin on your Brother CS6000i sewing machine, setting the stage for seamless stitching and successful sewing projects.
Step-2: Threading the Upper Thread
Threading the upper thread correctly is crucial for achieving optimal stitching results on your Brother CS6000i sewing machine. Follow these detailed steps to thread the upper thread accurately:

- Place the Spool of Thread:
Begin by positioning the spool of thread onto the designated spool pin located on the top of your Brother CS6000i sewing machine. Ensure that the spool rotates freely without any obstructions.
- Secure the Thread:
Once the spool is in place, use the spool cap provided with your machine to secure the thread in position. This prevents the thread from tangling or unwinding during the sewing process, ensuring smooth stitching.
- Follow the Thread Path:
Your Brother CS6000i sewing machine will have designated thread guides marked on the machine’s body. Begin by passing the thread through the first thread guide, typically located near the spool pin. Follow the indicated thread path as specified in your machine’s manual.

- Thread the Tension Discs:
Next, guide the thread through the tension discs. The tension discs regulate the amount of tension applied to the thread, ensuring even stitches. Make sure the thread is properly seated between the tension discs for optimal tension control.
- Thread the Take-Up Lever:
After passing through the tension discs, direct the thread through the take-up lever. The take-up lever is responsible for moving the thread up and down as you sew, ensuring proper stitch formation.
Thread the Needle:
Finally, thread the needle from front to back. You can do this manually by guiding the thread through the eye of the needle, ensuring it passes through smoothly. Alternatively, if your Brother CS6000i sewing machine is equipped with a built-in needle threader, follow the machine’s instructions to utilize this feature for convenient needle threading.
By following these detailed steps to thread the upper thread on your Brother CS6000i sewing machine, you’ll ensure smooth and hassle-free stitching, setting the stage for successful sewing projects. Take your time to thread the upper thread accurately, as proper threading is essential for achieving professional-quality stitches and impeccable sewing results.
Step-4: Threading the Bobbin
Threading the bobbin is a crucial step in ensuring the smooth operation of your Brother CS6000i sewing machine. Follow these detailed steps to correctly thread the bobbin:

- Winding the Bobbin:
Start by winding the thread onto the bobbin using the designated spool pin and winding mechanism on your Brother CS6000i sewing machine. Place the spool of thread on the spool pin allocated for bobbin winding, ensuring it rotates freely without any hindrance. Follow the specific instructions provided in your machine’s manual for winding the bobbin.
- Insert the Bobbin:
Once the bobbin is wound with thread, remove it from the bobbin winding mechanism. Open the bobbin cover located on the front or side of the machine and insert the wound bobbin into the bobbin case. Ensure that the bobbin is inserted in the correct direction and alignment, following the arrows or markings inside the bobbin case.
- Thread the Tension Spring:
After inserting the bobbin into the bobbin case, guide the thread through the tension spring located on the bobbin case. The tension spring helps maintain proper tension on the bobbin thread during sewing, ensuring balanced stitches.
- Thread the Bobbin Case Slot:
Once the thread is passed through the tension spring, guide it through the designated slot or groove in the bobbin case. Ensure that the thread is securely seated in the slot, preventing it from slipping out during sewing.
- Secure the Bobbin Case:
Finally, close the bobbin cover securely to secure the bobbin case in place. Ensure that the bobbin cover is properly seated and latched to prevent the bobbin case from dislodging during sewing. This step is essential for maintaining the integrity of the bobbin thread tension and ensuring smooth stitching.
By following these detailed steps to thread the bobbin on your Brother CS6000i sewing machine, you’ll ensure smooth operation and optimal stitching results. Take your time to thread the bobbin accurately, as proper bobbin threading is essential for achieving professional-quality stitches and seamless sewing experiences.
Step-5: Adjusting Tension Settings
Achieving balanced tension is essential for producing impeccable stitching results on your Brother CS6000i sewing machine. Follow these detailed steps to adjust tension settings effectively:
- Understanding Tension:
Take the time to understand how tension affects stitch quality and appearance. Proper tension ensures that the upper and lower threads interlock correctly, resulting in even and balanced stitches.
- Locating the Tension Dial:
Identify the location of the tension dial on your Brother CS6000i sewing machine. The tension dial is typically located on the front panel, near the needle area. It may be marked with numbers or symbols to indicate different tension settings.
- Balancing Tension:
Begin by setting the tension dial to the default or recommended tension settings based on the type of fabric you’re using. Refer to your machine’s manual for guidance on tension settings for different fabric types. Starting with the recommended settings provides a good baseline for achieving balanced tension.
- Testing Stitch Quality:
Sew a test stitch on a scrap piece of fabric to evaluate the balance of tension. Examine both the upper and lower sides of the fabric to assess the appearance of the stitches. Ideally, the stitches should look uniform and evenly tensioned on both sides.
- Adjusting the Tension Dial:
If the stitches appear too loose or too tight on either side of the fabric, it’s time to adjust the tension dial. Make small adjustments to the tension dial, either increasing or decreasing the tension incrementally. Turn the dial slightly towards a higher number for tighter stitches and towards a lower number for looser stitches.
- Recording Settings:
Once you find the ideal tension setting for your project, take note of the dial position for future reference. Recording the ideal tension settings allows you to quickly set the tension dial to the correct position when working on similar fabric types or projects in the future.
By following these detailed steps to adjust tension settings on your Brother CS6000i sewing machine, you’ll be able to achieve optimal stitch quality and produce professional-looking results consistently. Experiment with different tension settings and take the time to fine-tune the tension to suit your specific sewing project and fabric type. With practice and attention to detail, you’ll master the art of tension adjustment and enhance the overall appearance of your sewing projects.

Step-6: Testing Your Setup
Before diving into your sewing project, it’s essential to conduct a thorough setup test to ensure that your Brother CS6000i sewing machine is ready for seamless operation. Follow these detailed steps to perform a setup test:
- Selecting Scrap Fabric:
Choose a piece of scrap fabric that is similar in type and weight to the material you’ll be using for your project. This allows you to simulate real sewing conditions and gauge how the machine will perform with the actual fabric.
- Threading Verification:
Double-check both the upper and bobbin threads to ensure they are correctly threaded according to the machine’s manual. Verify that there are no tangles, knots, or snags in the threads that could disrupt the sewing process.
- Needle Positioning:
Ensure that the needle is securely inserted into the needle clamp and that it is the appropriate type and size for the fabric you’re using. Check that the needle is positioned correctly according to your machine’s specifications.
- Presser Foot Placement:
Lower the presser foot firmly onto the scrap fabric. The presser foot helps stabilize the fabric during sewing and ensures even stitching. Make sure the presser foot is securely in place before proceeding.
- Sewing Test:
Begin sewing on the scrap fabric, using the stitch settings and techniques you plan to use for your project. Monitor the formation and quality of the stitches as you sew. Pay attention to the tension of the stitches and how the fabric feeds through the machine.
- Tension Check:
After sewing a few inches, stop and examine the stitches closely. Check for any signs of unbalanced tension, such as loose or tight stitches. If necessary, adjust the tension settings on your machine to achieve balanced stitches.
- Finishing and Inspection:
Once you’ve completed sewing on the scrap fabric, inspect the stitches for any irregularities or issues. Look for skipped stitches, thread bunching, or other problems that may indicate an adjustment is needed.
- Final Assessment:
Based on the results of your setup test, make any necessary adjustments to the machine settings, such as tension, stitch length, or needle position. Take the time to address any issues before proceeding with your actual sewing project to ensure the best possible outcome.
By conducting a thorough setup test before starting your sewing project, you can identify and address any potential issues or adjustments needed, ensuring a smooth and successful sewing experience. Taking the time to properly prepare and test your machine setup will help you achieve professional-quality results and avoid frustration during your sewing projects.
Troubleshooting Common Issues
Even with careful preparation and setup, you may encounter common issues while using your Brother CS6000i sewing machine. Understanding how to troubleshoot these issues effectively can save you time and frustration. Here are some common problems you may encounter and how to resolve them:
- Thread Breakage: If the upper thread keeps breaking while sewing, first check for any tangles or snags in the thread path. Ensure the thread is properly seated in the tension discs and threaded through the needle correctly. Adjust the tension dial as needed to prevent excessive thread tension, which can cause breakage.
- Uneven Stitches: Uneven stitches can result from improper tension, incorrect needle size, or fabric feeding issues. Check the tension settings and adjust as necessary to achieve balanced stitches. Use the appropriate needle size and type for the fabric you’re sewing. Ensure the fabric is feeding smoothly under the presser foot by checking for any obstructions or debris in the feed dogs or presser foot area.
- Tangled Bobbin Thread: If the bobbin thread becomes tangled or jams during sewing, first remove the bobbin case and check for any thread snags or debris. Ensure the bobbin is wound evenly and inserted correctly into the bobbin case. Adjust the bobbin tension if necessary to prevent excessive thread buildup or looping.
- Skipped Stitches: Skipped stitches can occur if the needle is dull or incorrectly inserted, or if the machine is not properly threaded. Replace the needle with a new one and ensure it’s inserted correctly and securely into the needle clamp. Rethread the machine, paying close attention to the thread path and tension settings.
- Machine Jamming: If the machine jams or locks up while sewing, stop sewing immediately and turn off the power. Carefully remove the fabric and check for any obstructions in the bobbin area or needle plate. Clear any thread snags or debris, then rethread the machine and resume sewing.
Conclusion:
Threading the Brother CS6000i sewing machine is a fundamental skill that sets the stage for successful sewing projects. By following these detailed instructions and expert tips, you’ll navigate the threading process with confidence and precision. Remember to prioritize safety, practice patience, and consult your machine’s manual for specific instructions. With dedication and practice, you’ll master threading and unlock endless creative possibilities for your sewing endeavors. So, gather your fabric, thread your machine, and let your creativity soar!