Threading a serger — especially the Brother 1034D — can feel intimidating the first time. With four threads, multiple tension dials, and color-coded paths, it’s easy to worry you’re doing something wrong.
But once you understand the correct order and how each looper and needle works, the whole process becomes simple and repeatable.
🧵 What You Need Before You Start
- Your Brother 1034D serger
- Four thread cones
- Good lighting (trust me — it helps!)
- Tweezers (optional but can make threading easier)
- Scissors
🟦🟨🟥🟩 Understanding the 1034D Color Codes
The Brother 1034D uses four color-coded thread paths:

- Yellow → Left Needle
- Red → Right Needle
- Green → Upper Looper
- Blue → Lower Looper
➡️ Important: Sergers must be threaded in the correct order for stitches to form properly.
🧵 Threading Order for Brother 1034D (Always Follow This Sequence)
1️⃣ Upper Looper (Green)
2️⃣ Lower Looper (Blue)
3️⃣ Right Needle (Red)
4️⃣ Left Needle (Yellow)
If you don’t follow this order, the machine will skip stitches or won’t sew at all.
🔧 Step-by-Step: How to Thread a Brother 1034D Serger
Beginner-Friendly, Detailed, and Written for Complete Clarity
Threading the Brother 1034D for the first time can feel overwhelming: four cones of thread, two needles, and multiple loopers tucked deep inside the machine. It’s a lot to take in — but once you understand the correct order and how each thread path works, the process becomes almost second nature. In fact, after threading it a few times, you’ll wonder why it ever seemed complicated.
Below, deeply detailed, easy-to-follow guide that walks you step-by-step through the entire threading process. This covers everything from raising the presser foot to testing the final stitch so you know exactly what to do and what to look out for.
Let’s get started.
⭐ Before You Begin: A Quick Mindset Shift
Most beginners struggle with sergers because they try to treat them like regular sewing machines. But a serger is different. It relies on:
- Four thread paths that must work together
- Looper threads that interlock under the fabric
- Needle threads that lock the stitch in place
- Proper tension across all four threads
The most important rule of serger threading — and especially on the Brother 1034D — is:
👉 You must thread the machine in the correct order
This is not optional. Even one thread placed out of order can prevent the serger from stitching correctly.
With that in mind, let’s begin threading your Brother 1034D serger properly and safely.
🧵 Step 1: Raise the Presser Foot
Raising the presser foot is the first and most important step because it releases the tension discs. When the tension discs are open, the thread can slide into its guides smoothly and evenly. If the discs are closed, the thread may sit on the outside instead of inside the tension mechanism — leading to skipped stitches, broken threads, or loops that won’t form correctly.
Why this matters:
If you try to thread the machine while the tension discs are engaged, it will feel like your thread is “fighting back” or not going into the slot. This happens because the discs clamp the thread tightly. Raising the presser foot fixes this issue every time.
Beginner tip:
If your stitch tension looks wrong after threading, re-thread with the presser foot up. It solves most tension problems immediately.
🔌 Step 2: Turn Off the Machine
Safety should always come first when working with a serger. Sergers have:
- Two needles
- A fast-moving blade
- Multiple moving parts when powered
You never want the serger to accidentally run while your fingers are near the loopers or needle area.
Turning the machine off ensures that:
✔ The motor won’t start
✔ The needles won’t move
✔ You can thread the machine safely and calmly
Bonus tip:
Unplugging the machine gives you extra peace of mind. Many sewists develop this habit early on.
🟩 Step 3: Thread the Upper Looper (Green Path)
The upper looper is responsible for creating the top half of the overlock stitch. It crosses over the fabric edge and links with the lower looper thread underneath. Because of its path, the upper looper is fairly straightforward to thread.
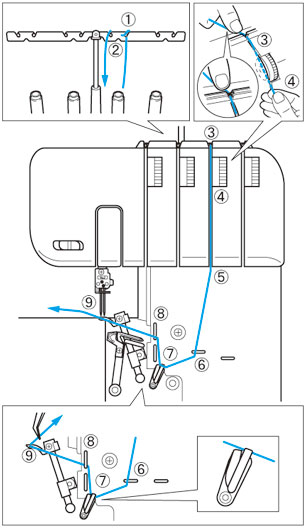
How to thread the upper looper:
- Place the thread cone on the third spool pin from the left.
- Pull the thread up through the thread stand and down into the first green guide.
- Guide the thread through each green-marked hook, path, and tension disc.
- Continue down toward the looper area — this section is located at the lower right front of your machine.
- Use tweezers (highly recommended) to thread the eye of the upper looper.
You’ll know you’ve threaded it correctly when the thread:
- Moves freely
- Lays on top of the lower looper when the serger runs
- Doesn’t snag on any guide
Why this step is important:
The upper looper is half of your serger’s stitch foundation. If it’s not threaded correctly, the entire stitch fails.
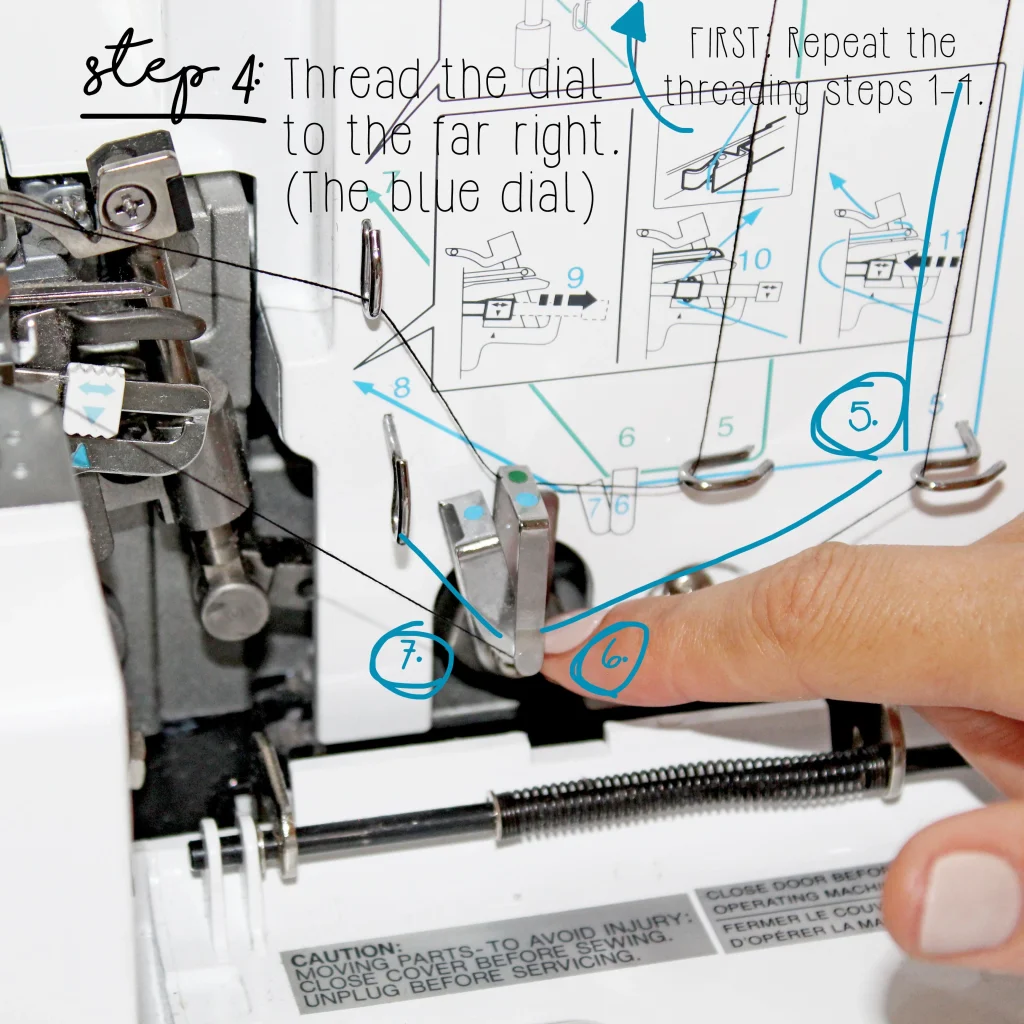
🟦 Step 4: Thread the Lower Looper (Blue Path)
The lower looper is the most intimidating part for beginners — but once you understand the motion, it becomes simple and satisfying. It forms the bottom half of the overlock stitch and loops over the edge of the fabric from beneath.
On the Brother 1034D, the lower looper has a few “hidden” guides, which is why many people mistakenly skip steps. But don’t worry — this explanation makes everything easy.

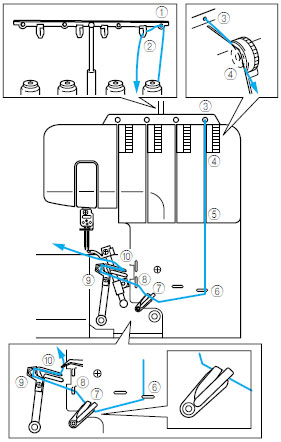
How to thread the lower looper:
- Place your thread cone on the far-right spool pin.
- Pull the thread up and through the thread stand, then into the first blue guide.
- Guide the thread down through the blue tension disc.
- Follow the blue-colored path as it winds around the lower looper’s metal hooks.
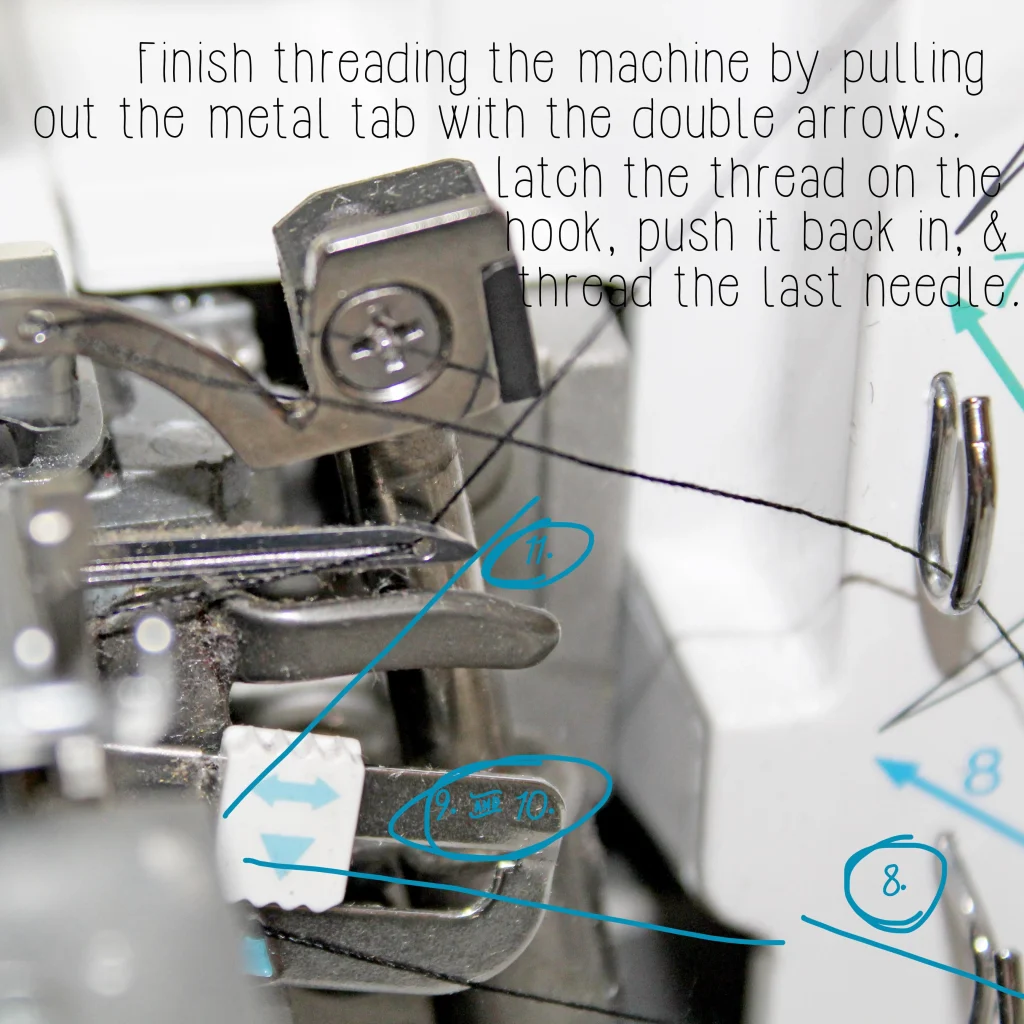
- Pull the white looper release tab toward you. This unlocks the lower looper arm and gives you easier access.
- Thread the lower looper eye from front to back.
✔ Lower looper tip:
If the lower looper is not threaded correctly, your machine may:
- Not stitch at all
- Snap thread immediately
- Form loose or uneven loops
- Create a messy or unraveling seam
Most stitch problems are caused by improper lower-looper threading, so take your time here.
🟥 Step 5: Thread the Right Needle (Red Path)
The right needle creates a narrower seam than the left needle and is used for:
- 3-thread overlock
- Narrow seams
- Lightweight fabrics
It’s the third thread in the threading sequence.
How to thread the right needle:
- Place your third thread cone on the second spool pin.
- Follow the red path downward, making sure you pass through every guide.
- Bring the thread behind the final guide above the needle bar.
- Thread the right needle eye from front to back.
✔ Tip:
Use the built-in needle threader if your machine has one. Otherwise, a bright light and a pair of tweezers help a lot.
🟨 Step 6: Thread the Left Needle (Yellow Path)
The left needle forms a wider overlock seam and is essential for most 4-thread serging. This is the final threading step.
How to thread the left needle:
- Place your last thread cone on the far-left spool pin.
- Pull the thread up and through the thread stand.
- Follow the yellow path down through all guides and hooks.
- Bring the thread behind the last guide near the needle bar.
- Thread the left needle from front to back.
✔ When all four threads are in place, gently pull them under the presser foot toward the back of the machine as a group.
🧪 Step 7: Test Your Stitch
Now that your Brother 1034D is fully threaded, it’s time to run a test stitch.
Set your machine to a 4-thread overlock stitch — the most common serger setting.
Use a scrap piece of fabric (preferably woven cotton) and begin serging.
A perfect 4-thread stitch should show:
✔ Smooth, even loops
The upper and lower looper threads should wrap over the fabric edge neatly.
✔ No loose threads hanging off the edge
If loops fall off the edge, your tension is too low.
✔ No puckering or gathering
If your fabric is pulling inward or wrinkling, your tension is too tight.
✔ Balanced needle threads
Look at the needle threads on top of the fabric — they should sit parallel and clean.
If anything looks off:
- Rethread the lower looper first
- Check the threading order
- Confirm tension settings
- Make sure the presser foot is lowered when stitching
In summary, Threading the Brother 1034D may look complex, but once you understand how each thread path works, the process becomes easy to repeat. The key is always following the correct order — upper looper, lower looper, right needle, left needle — and making sure the threads sit properly in their guides and tension discs.
🔍 Troubleshooting: If Your Stitches Look Wrong
❌ Threads breaking
✔ Rethread the lower looper first.
❌ Loops hanging off the edge
✔ Increase tension on looper threads.
❌ Fabric puckering
✔ Decrease needle tension.
❌ Machine won’t stitch
✔ You threaded in the wrong order — redo all threads.
🔄 How to Re-Thread Without Starting Over
If only one thread breaks:
- Tie the new thread to the old one.
- Pull it through the guides gently.
- Re-thread the needles manually (knots can’t pass needle eyes).
💡 Pro Tips for Beginners
- Use tweezers — it makes threading so much easier.
- Always keep extra cones of the same thread for consistent stitches.
- Clean lint buildup weekly — sergers collect dust fast.
- Threading in good lighting reduces mistakes dramatically.
📌 Frequently Asked Questions
Is the Brother 1034D hard to thread?
Not once you follow the color codes. After 2–3 times, it becomes fast and easy.
Do I need special serger thread?
Regular thread works, but serger cones are better for speed and consistency.
Why does my serger keep snapping thread?
This is usually a lower-looper threading issue or incorrect tension.
🏁 Conclusion
Threading the Brother 1034D serger doesn’t have to be stressful. With the right order — upper looper, lower looper, right needle, then left needle — and by following the color-coded guides, you’ll have perfect stitches every time.
This beginner-friendly method makes the process simple, safe, and repeatable.